Do you want to install CKEditor in Laravel? CKEditor is a WYSIWYG HTML editor that allows us to write rich text formats. In this article, we show you how to install and use CKEditor in Laravel.
Why Need To Use CKEditor?
HTML provides a textarea element for writing description. But, textarea comes with some limitations. In textarea, it’s not easy and user-friendly to write other HTML elements like p, div, img, etc.
To overcome such limitations, we can use CKEditor which itself is a rich text editor. Our final output will look like the below screenshot.
Install CKEditor In Laravel
There are 2 ways to install CKEditor in Laravel – CDN and CKEditor package. You can get both resources from their download page.
CDN link is
//cdn.ckeditor.com/4.13.1/standard/ckeditor.js. In the case of CDN you don’t need to download anything from the CKEditor website.
If you intend to install it without CDN then download the package(Standard Package recommended). Next, create a folder ‘ckeditor’ inside the public directory. And inside this ‘ckeditor’ folder copy below files and folders from the downloaded package.
How To Use CKEditor
At this stage, we have completed the steps for installing the CKEditor package. Now let’s see how to use the CKEditor.
Let’s say we have a textarea which should get replaced by CKEditor. To do so we are adding id ‘summary-ckeditor’ to the textarea.
1
| <textarea class="form-control" id="summary-ckeditor" name="summary-ckeditor"></textarea> |
Next, we need to include
ckeditor.js file and write a JavaScript code which replaces textarea with CKEditor.
1
2
3
4
| <script src="{{ asset('ckeditor/ckeditor.js') }}"></script><script> CKEDITOR.replace( 'summary-ckeditor' );</script> |
Above JavaScript code replaces textarea with the CKEditor. If you want to use CDN then above code would be as follow:
1
2
3
4
| <script src="//cdn.ckeditor.com/4.13.1/standard/ckeditor.js"></script><script> CKEDITOR.replace( 'summary-ckeditor' );</script> |
Upload and Insert Image in CKEditor
CKEditor by default does not give the option to upload the image from your computer. If someone looking to give this option then read on. It needs to add a route, image upload and some JavaScript code to our application. At first, to enable the image upload option you need to call CKEditor in the following way.
1
2
3
4
5
6
| <script> CKEDITOR.replace( 'summary-ckeditor', { filebrowserUploadUrl: "{{route('upload', ['_token' => csrf_token() ])}}", filebrowserUploadMethod: 'form' });</script> |
Here for the key
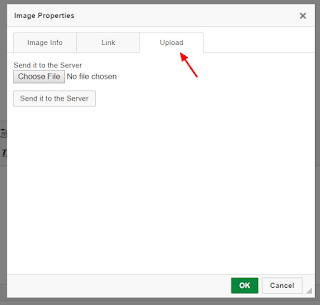
filebrowserUploadUrl we pass the route URL and csrf token. We will define this route in the next step. Now if you click on CKEditor’s image icon you will see the image upload option.
Let’s define the route and a controller’s method which upload and insert the image.
1
| Route::post('ckeditor/image_upload', 'CKEditorController@upload')->name('upload'); |
To use the uploaded image in CKEditor we need to upload the image in our application folder and send back an image URL. For storing an image on a server, we’ll use the Laravel storage feature where we create a symlink of a ‘storage’ folder. To create a symlink, run the command:
php artisan storage:link
Next create a controller
CKEditorController and define upload method in it as follows:
1
2
3
4
5
6
7
8
9
10
11
12
13
14
15
16
17
18
19
20
21
22
23
24
25
26
27
28
29
30
31
32
33
34
35
36
37
| <?phpnamespace App\Http\Controllers;use Illuminate\Http\Request;class CKEditorController extends Controller{ public function upload(Request $request) { if($request->hasFile('upload')) { //get filename with extension $filenamewithextension = $request->file('upload')->getClientOriginalName(); //get filename without extension $filename = pathinfo($filenamewithextension, PATHINFO_FILENAME); //get file extension $extension = $request->file('upload')->getClientOriginalExtension(); //filename to store $filenametostore = $filename.'_'.time().'.'.$extension; //Upload File $request->file('upload')->storeAs('public/uploads', $filenametostore); $CKEditorFuncNum = $request->input('CKEditorFuncNum'); $url = asset('storage/uploads/'.$filenametostore); $msg = 'Image successfully uploaded'; $re = "<script>window.parent.CKEDITOR.tools.callFunction($CKEditorFuncNum, '$url', '$msg')</script>"; // Render HTML output @header('Content-type: text/html; charset=utf-8'); echo $re; } }} |
That’s it now try to upload the image from CKEditor’s built-in image option and you will get the image added in your editor.
We hope you understand how to install and use CKEditor in Laravel. For any questions or suggestions please leave a comment below.


No comments:
Post a Comment